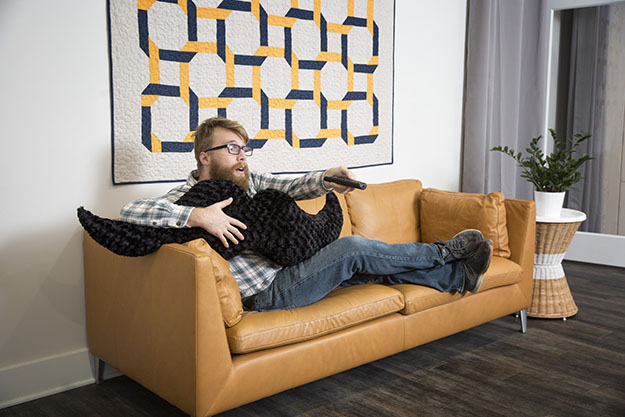
This month is Movember, and if you haven’t heard, it’s a month dedicated to raising awareness for men’s health issues, from physical to mental and all aspects in between. To help call attention to men’s health, men are encouraged to grow a moustache, and start a conversation with those around them.
Some men have the ability to grow facial hair easily, and others not so much. I have joined the no-shave November club this month (although due to filming obligations, I started my shaving vacation a week early), and I suggest you visit Movember.com to learn how you can help educate others about men’s health issues. Along with hanging up my razor for the time being, I teamed up with Missouri Star Quilt Co to create this moustache pillow!
Let me tell you how much I love this moustache pillow! It’s everything you are looking for in a facial follicle-themed creation, with cozy minky and a cuddle-friendly design that make it the addition to your bed or couch you never knew you needed!
Read on below to learn how to make this fan{tache}tic project for yourself or that special guy in your life. To help you get started on your super ‘Stache pillow, we’ve included a FREE moustache template that you can download HERE!
Moustache Pillow
Supplies needed:
1 yard of minky or cuddle fabric (We really liked the Cuddle Embossed Rose 60” Minky by Shannon Cuddle)
4 bags of Poly Fil
Step 1: Gather supplies and print off and tape together the moustache printable
Step 2: Fold 1 yard of minky/cuddle fabric vertically (on the long so that it is approximately 60 by 18 inches and pin together, right sides together (with the fuzzy side facing in)
Step 3: Print off your moustache template. We printed off two templates so that we could cut out the complete moustache, but you can easily flip the template after you finish cutting one side if you would like.
Step 4: Pin the pattern to the fabric. We pinned our moustache about every 3 to 4 inches, and used a few more pins around the curves to keep everything in place.
Step 5: Cut out your ‘stache using a pair of fabric scissors.
Step 6: With the right sides still together, start sewing! We used a serger on ours, but you can use a standard sewing machine. We recommend you use a zig zag pattern for extra security.
Step 7: Sew around the entire moustache, but leave a 6-inch opening so you can stuff it. We used almost four entire bags of Poly-Fil so we have a nice, full ‘stache
Step 8: Hand sew the opening closed using a blindstitch, and you are ready to rock your moustache pillow!
Step 9: Have some fun! What good is a moustache pillow without a ‘stache selfie?! Be sure to share yours with me on the Man Sewing Facebook or Instagram using #mansewing #movember
I hope that this tutorial for your very own moustache pillow will help you create something that will serve as a reminder to take care of yourself, and to encourage the other men in your life to do the same!


