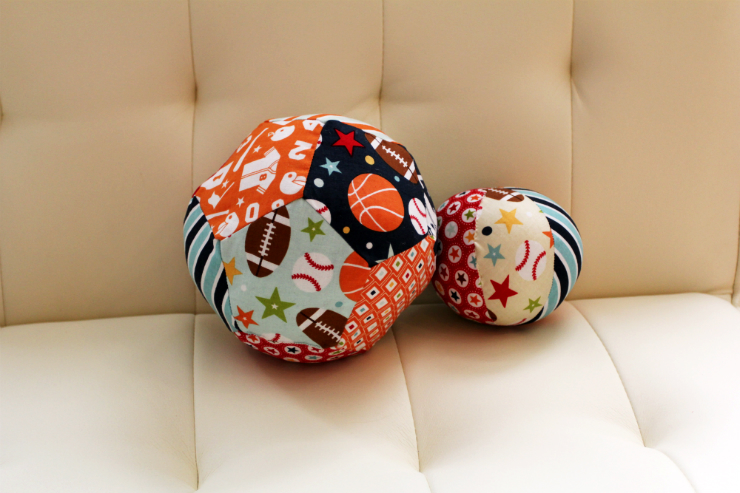
It’s that time of week again and we have a sweet tutorial for you! You’re in for a fun treat! Follow along as Rob shows you how to create an easy and fun Pentagon Ball that’s great for your kids or pets! Stick a bell inside and boom! Instant entertainment!! Use the free template in the link below and adjust it to make your Pentagon any size you want!
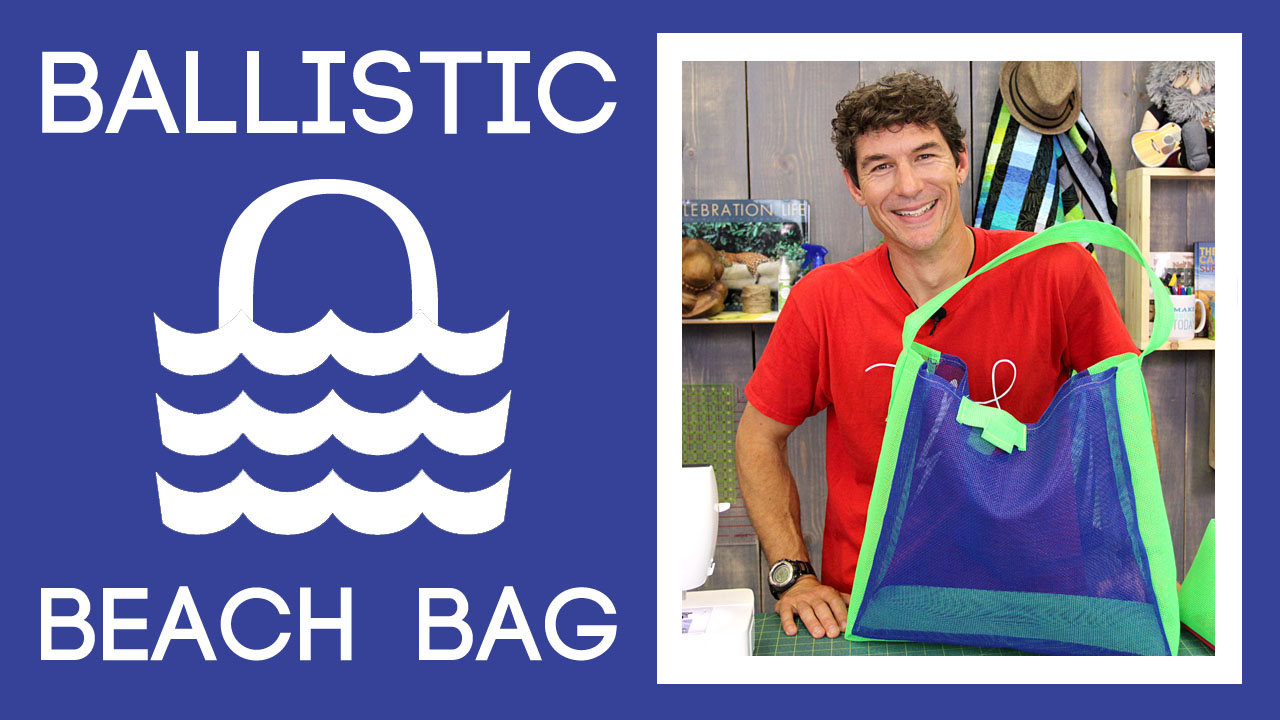
Let’s be honest here, a person can never have too many bags! My wife has so many that she has a bag to hold all her bags! It’s a little ridiculous but it’s okay because I love her. It’s also okay because I’m an enabler of the bag craze! Today’s tutorial is a great example of that!!
We live in California and go to the beach a lot! So this bag was a necessity for my families’ bag collection! We use this one for grocery shopping, days at the park and just about any time we have to carry things! (Except for sneaking snacks into the theatre… it doesn’t work too well for that!)
This is my son using his bag while on duty as a Junior Lifeguard!
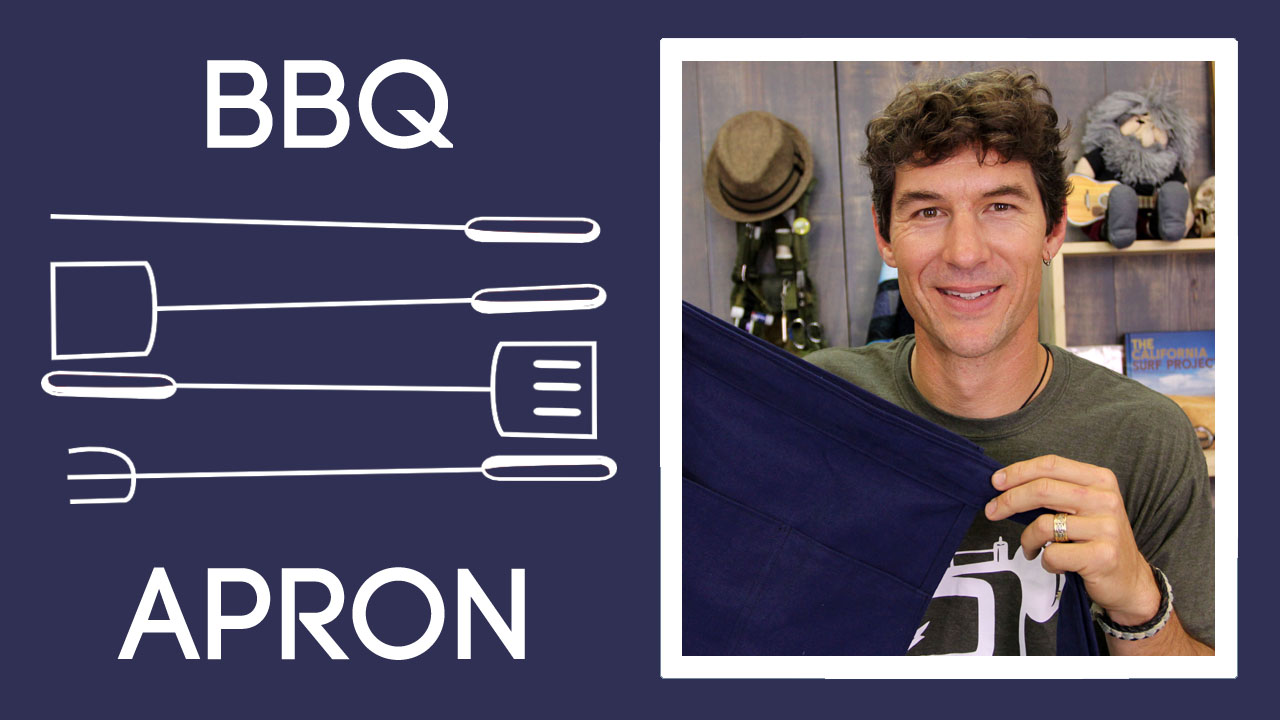
Summer is one of my favorite seasons because of the food! BBQ, s’mores, watermelon, corn on the cob, I could go on forever! I’m especially excited for the food this summer because I’ll be preparing it in style! In today’s tutorial I’ll show you how to make an apron that’s perfect for any dude or chick that’s cooking! This apron is unique because it has a grommet to slip your towel through! If you’re like me and like to stay clean while cooking then you want to make one of these!
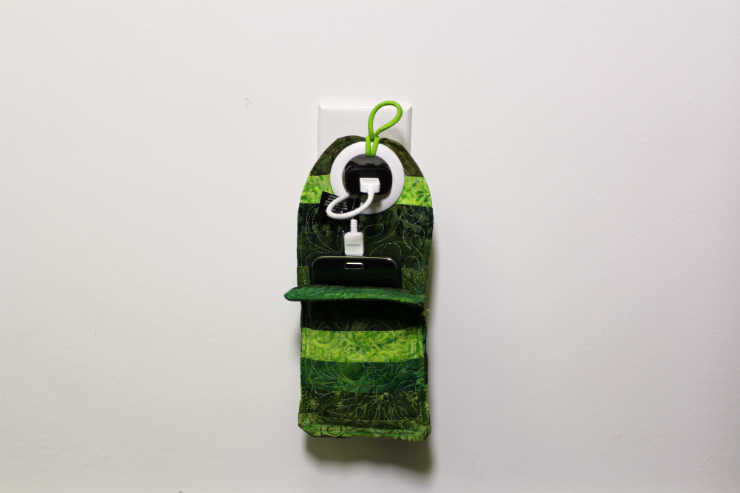
This is a tutorial for something that everyone needs or wishes they had. It would make a great gift too, just in time for Father’s Day or you’re looking for a great functional gift for a teenager (boy or girl)! It’s a charging station for your favorite electronic devices, whether it’s your cell phone, iPod, MP3 player or tablet.
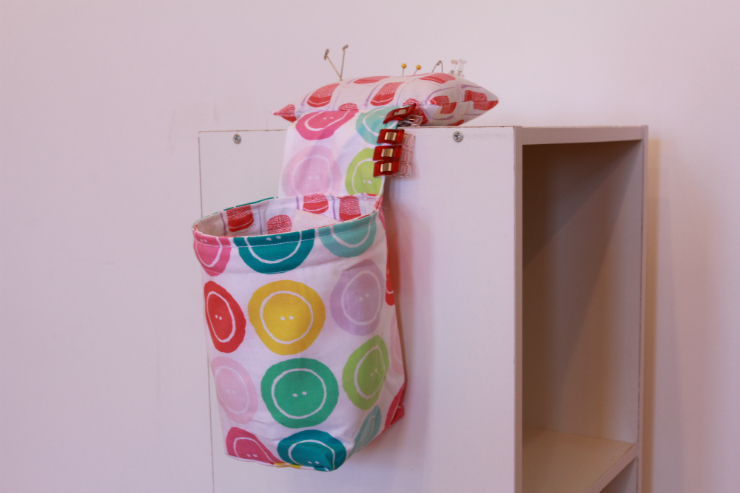
What do you do to keep your sewing room tidy? I don’t know what I would do without my weighted pincushion and scrap bag, so I’m showing you how to make one for yourself!
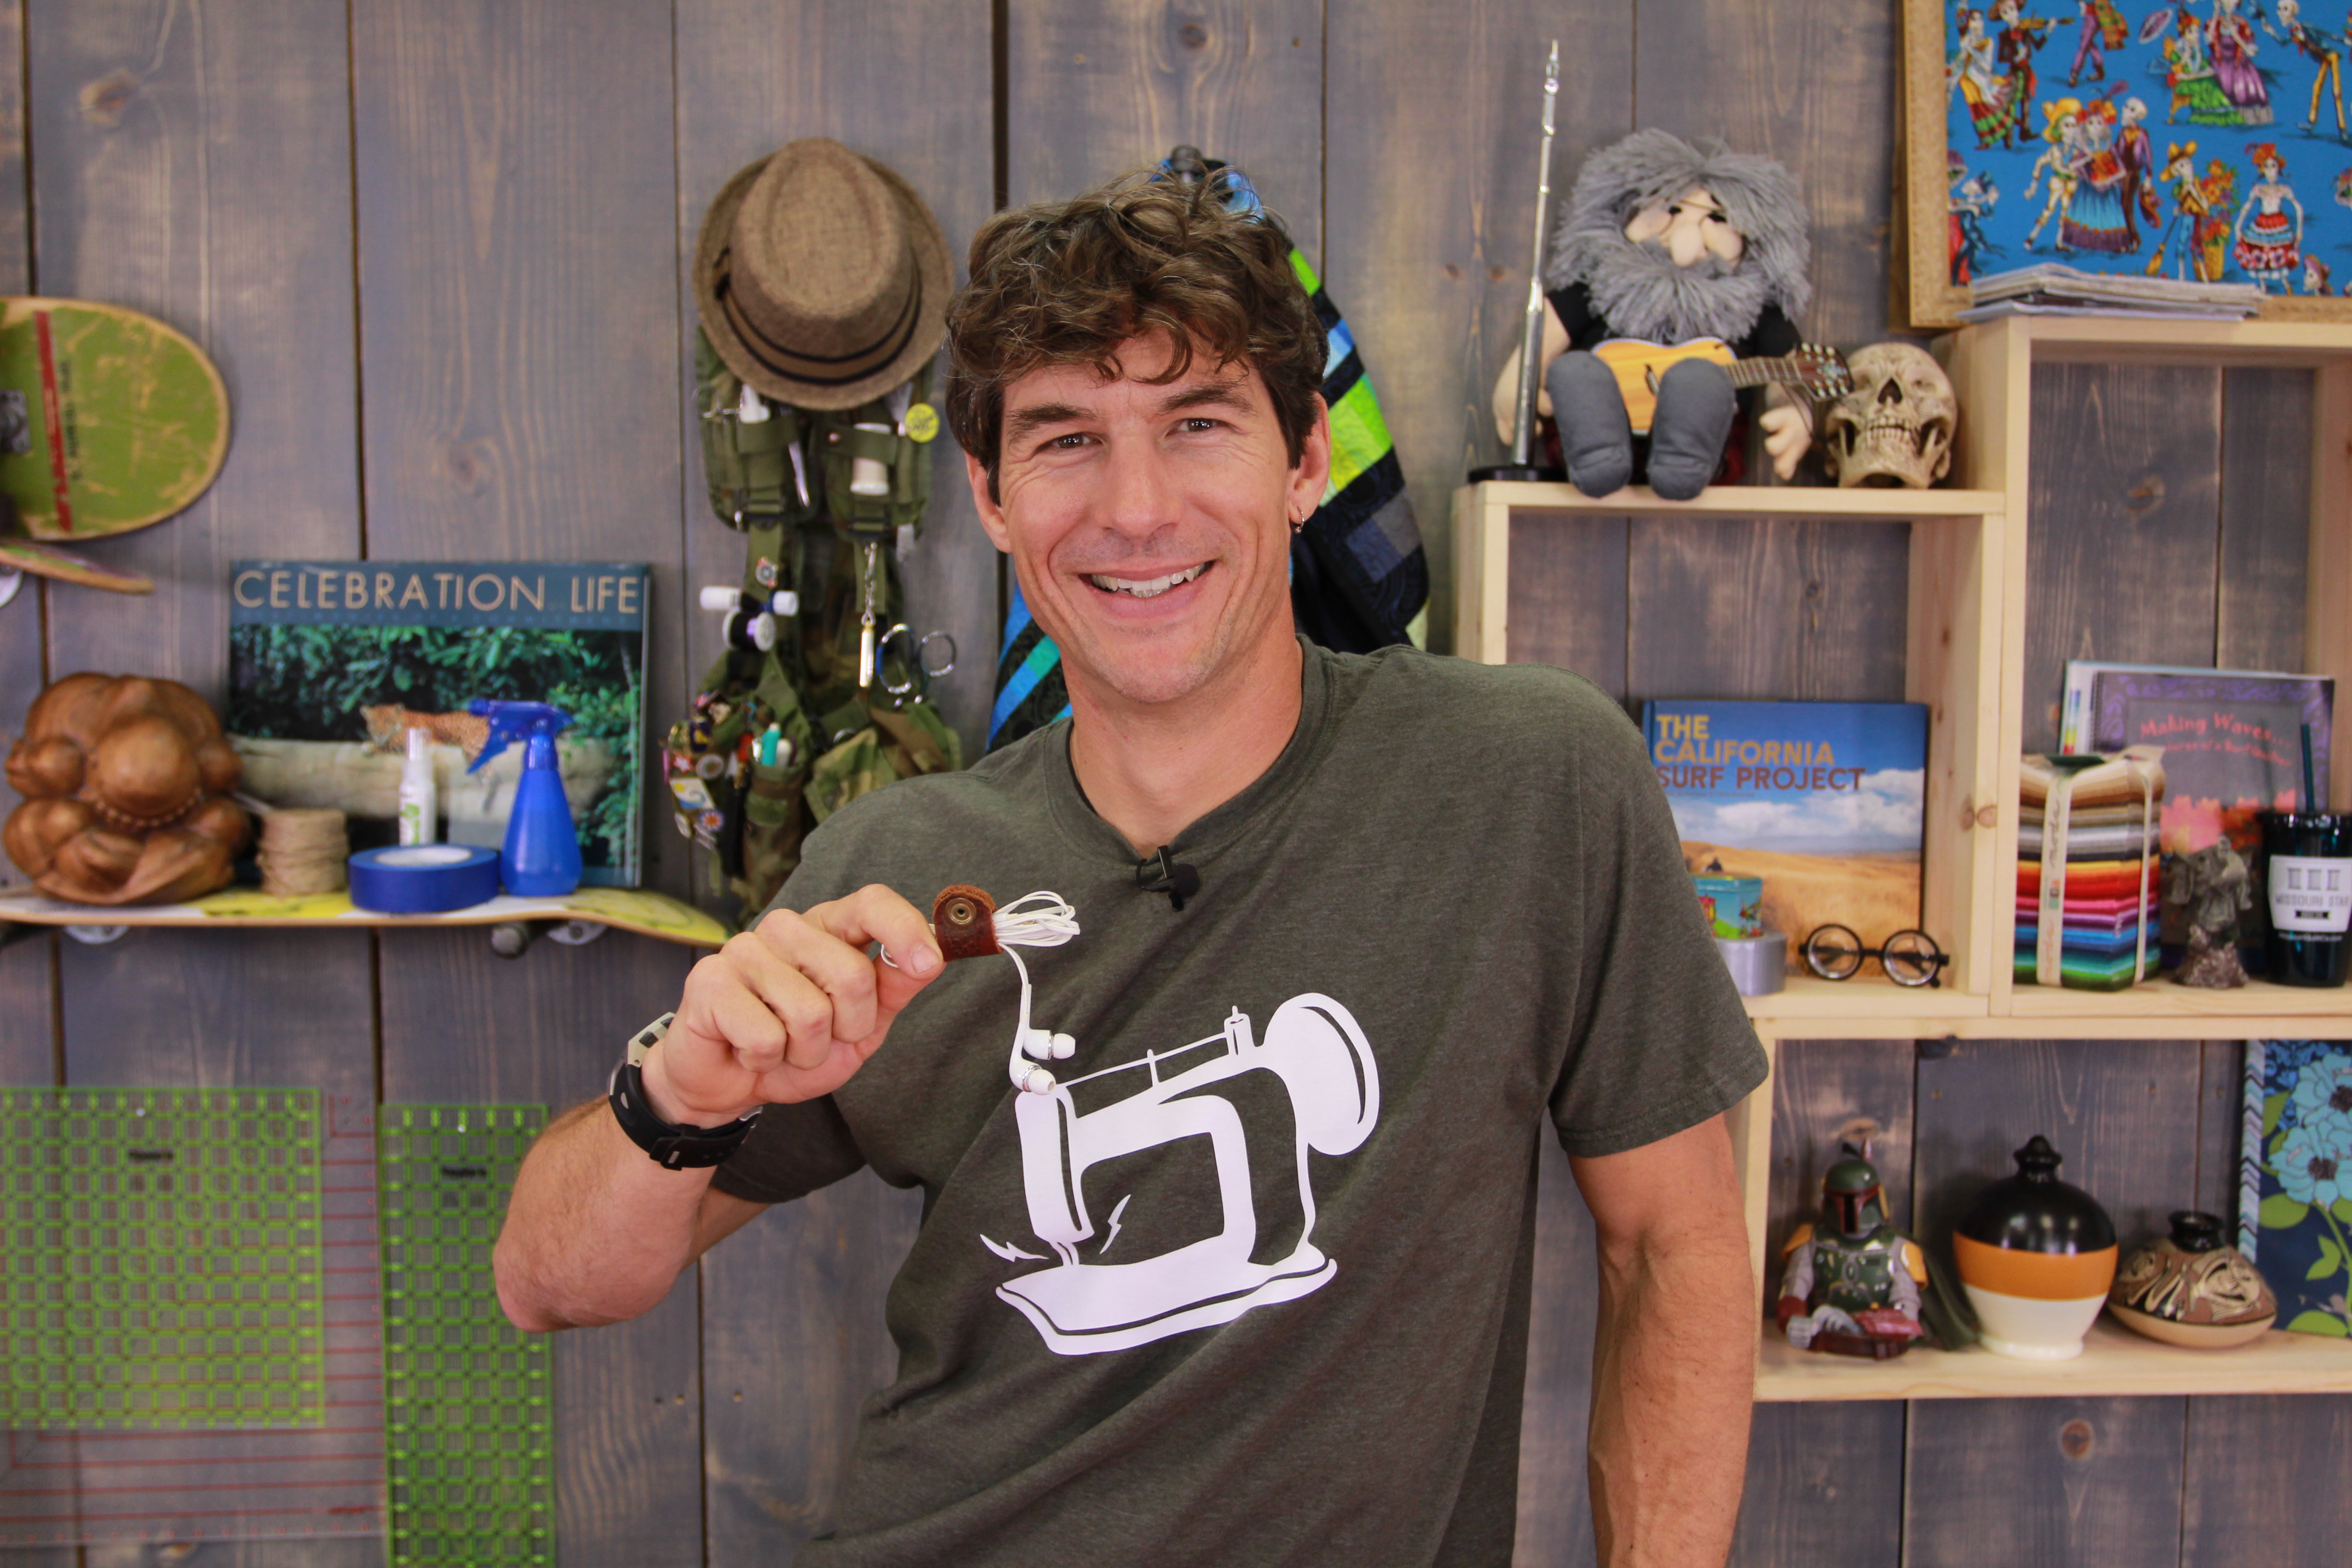
We all need ways to tidy up our earbud cords, phone chargers etc, so here’s a great tutorial (sewing optional) that you can easily carry in your pocket! This is also a great stocking stuffer or gift for any occasion!
Hey, everybody! It’s Rob from Man Sewing and I’ve got a tutorial around here somewhere, oh! There it is! Here’s today’s tutorial. That’s right, I’m going to show you how to make these awesome earbud cord keepers. So, I love having my earbuds with me always in my pocket, but they used to be this nasty, tangled mess and the phone would be ringing and I would be trying to get them plugged in and listen. Or, maybe I’m listening to music and I’ve got a knot in the cord or something.
So, I was shopping in a Target years ago, and they have all those little things along the counter that you play with while you’re waiting in line, and there was this piece of plastic that was called a cord keeper and I thought, “what on earth is this?” And, so, I didn’t get it. And all of the sudden I got home and thought, “man, I sure wish I had something to wrap my little earbuds around to make them comfortable and keep them in my pocket.” And I don’t like stuff in my pocket, really, so I didn’t want them all over the place.
So, watch how this works. This is awesome. It’s just a piece of leather. You can use fabric or ribbon or whatever and it just has a set of snaps in it. So, that’s the main working part right there, ok? And I’ve been using this for about six or eight months. So, this has got some real longevity and use out of it. And then my cord just unwinds, just like that, super easy, ok. Let me put this away, real quick, just by wrapping it around my hands. Ok? And I kind of give it a little pinch, like, yay. I made that look terribly difficult, didn’t I? And snap it closed and it’s ready to go back in my pocket. Alright? So the supplies you’re going to need for something, like, really, is just a set of snaps, and you could probably also use velcro if you are using lightweight fabrics, but I want to show you how to do the snaps. That’s actually mostly what you’re getting out of the tutorial, right, is how to install the snaps. So, a set of snaps actually has four pieces that all work together. So, you’re going to need one of those. You’ll need the snap setting tools and these generally come in the package. So if you’re buying snaps, make sure you don’t buy a replacement package if you don’t already have the working tools you need, ok? We’re going to need a pair of scissors to cut a hole in our fabric, we’re going to need a Sharpie marker to mark where that hole’s going to be, and then my favorite of all my tools today, yes, the 12 pound sledge hammer. No! We’re just going to use a nice, lightweight hammer, but we’re going to give this thing a couple good smacks when we’re done. So, you ready to get started and learn how this works?
While you’re watching this, I want you to be thinking about the different kinds of ways you can do this. I’m going to show you real quick with leather. This is a lightweight suede we have here, a little flexible. That kind of makes it nice for gripping around. It’s nice and pliable. And, again, I don’t like a lot of weight in my pocket, so this one was a three inch by one inch strip that I just made and snapped together. The raw goods kind of just look like that, right? Easy. Another one I was making this morning, just for fun, was one that I picked up in Nantag. Actually my wife and I were working at an event together, so we have nametags. So, don’t tell her that I am making her a very nice Christmas present right now, ok?
So, this is going to snap together the same, right? You could also do fabric. If I was doing two pieces of fabric, I would put some interfacing inside just to give it a little bit of body and that would be a good time to stitch through velcro also, ok? So, oh! I know there’s something else I’ve got to tell you because I was talking with Jake, the camera guy, a little while ago about this. Don’t try to sew through sticky backed velcro. This would be a perfect place for sticky backed velcro, but I don’t want you to needle through the sticky back. It just does terrible things to the needle and thread. So, if you’re thinking, oh, this is the perfect place for those sticky dots for velcro, no, no. I want you to stitch your velcro on if you’re using that. Ok, enough words, let’s get started on this. And, like I said, let’s finish out my wife’s Christmas present here before Santa shows back up. And, for this, the first thing I really want to do is just figure out where I’m going to put the snap. I need to cut a very small hole. And so, for this, I could try to put a little bit of pressure here and see if it will mark the back of my fabric. It’s done a little bit. If I couldn’t see it, the other thing I could try to do is, I could try to put my snap through here, right? Take my Sharpie marker and feel where that post is going to come through the fabric, right? What I don’t want to have happen, is, I don’t want my snap to fall off of the edge; I want it to be nicely centered in there. Ok, so I want that to finish in, like that. Nice and easy. So, once you’ve figured out where you’re going to put your snap, you’re going to fold it over. And what I’m going to try to do is use the back end of my scissor and make just the littlest cut possible to bring that post through, just like that, ok? Now, your snap setting tools have two sides. There’s kind of what looks like a record, like an old LP, right? That’s a black version of a CD, if you’re watching and you’re not 40 years old like some of us. And then the other side’s got a bowl or a dish. So, the pretty side of the snap is going to go into the dish and then this pounding tool has got a little dimple on the front or a little skinnier part on the front that’s going to fit right into the skinny part there, but first I need to put on the part of the snap that is going to get caught in here. I don’t actually think it matters which side you use for which, but I’m going to switch this around because I like to have the female side underneath that pretty side there. Now, I have a chunk of lumber underneath my table that’s just part of my working table here in my studio, and so I’ve moved this down here so I can give this a pound. Oh, this would be a fantastic time to turn the speakers down on your computer. I’ll give you a second. Ok, you ready?
Now, I’m going to give this a couple of good smacks. Come in! Just like that. Nice and secure. What do you think, ok? Now, let’s go ahead and do the same thing for the other side. I’m going to visually line that up, give it a little bit of a mark, just like I’ve got there. Slide that out of my way. Now, I always start by putting the pretty side on first so that I know where it’s going to be and where I’m going to line everything up and that I know that I have the orientation of the snap correct. From this part on, I’m going to drop in now what is considered the male part of the snap and I’m going to make sure that it’s going to work.
So, I’m kind of giving it a dry fit or a dry test to make sure that I have both parts on the right side of the fabric or the correct side of the fabric. I’m going to take and flip that over to the record player looking side of the record side of that and then the back of that snap, oh! Did I forget, did I forget to tell you to turn your speakers back up? If you missed that, you can rewind it now. Time to turn your speakers down. Ready? Turn your speakers back up! Ok, now we’re ready. Now, fantastic. We have that, just like, yay. It’s going to snap together and I think what I’ll do is tie this with a nice little red ribbon and put it in silky, like one of those satin little boxes, something about yay big. She’s going to probably think it’s a ring or some other piece of beautiful jewelry. Won’t she be surprised at Christmas? That’ll be so much fun! So that’s my real, fun, little example of how to keep your earbuds under control and in your pocket and I’m going to go put these in my smart phone and listen to some great music while you’re making yours and we’ll see you next time here at Man Sewing.
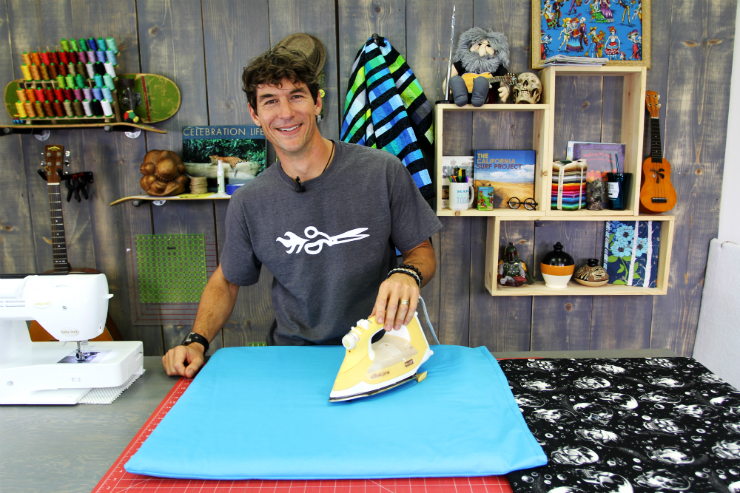
We’ve gotten so many comments and questions about Rob’s ironing board, so we just had to do a tutorial! Enjoy this tutorial on a Portable Ironing Board using leftover fabric bolts!
This sewing tutorial is going to make you the winner of playtime! Rob teaches us how to make this super cool superhero cape for anyone with a big imagination!
Hey everybody! It’s the Flash from Man Sewing and today my good friend Rob is going to show you how to make an awesome cape. Gotta fly, find myself a phone booth, and change, and get Rob to help you out. Hey everybody! So sorry about that. I understand my buddy, the Flash just came flying through here to steal my thunder and get you all jazzed up about today’s tutoriala superhero cape for your children (or you, as long as they don’t catch you wearing it, right?). So, what we’re going to do today is we’re going to take a print and we’re going to use some solids to make a really fun superhero costume, let’s say. So I’ve got a DC comic licensed print that was put out by Camelot fabrics. I love some of the licensed goods that they do, and then I just chose a green and a yellow and a red, a solid to match, and then we’re going to use those to make the applique. Now, to make the applique, I literally typed into my Google search, I think it was, “superhero logos,” and it came up and there’s an entire alphabet available and we’re going to drop that link in the, in the comment section below for you so that you can go ahead and follow that, but there’s every letter in the alphabet set up, like this. I want to show you first how to make the background for the cape and then we’re going to come back to the applique. Alright? So for my size cape, and I’m not the biggest guy you’re ever going to meet, I’m barely six foot tall, right? So I’m using a yard and a quarter of fabric. For a child, maybe a yard, if you have somebody maybe six and half foot tall or something like that, a yard and half. I’m not sure, but you’ll basically just need a yard and a quarter of the print and a yard and a quarter of the main solid for your liner this green. And then, I use like fat quarters for the other solids I’m going to use to make my logo. A little bit of fusible web, and that’s about all we need for this project, right? So, the first thing is, is this particular comic happens to have a direction to its print. So I want to make sure that this is the bottom and this is the top of my print. So, I’ve already precut these to try to make these pieces of fabric just as close to the exact same size as possible and they are folded on the selvedge, ok? And then what I need to do first is, I’m going to show you how to prepare these pieces. And we’re going to do a little bit of marking and we’re going to actually end up cutting most of the selvedge off anyways, so I’m going to try to take this nice and slow for us. I’m going to need my little sharpie that I’ve already got out, and I’m going to need my ruler. So, the first cut, I’m actually going to mark on the selvedge side and I’m coming up five inches from the bottom. I’m also telling you right now that I’m cutting both fabrics at the exact same time. So, even if they’re not exact, they’re exactly the same, if that makes sense. So, I’m coming up five inches from the bottom, making myself a nice mark, ok? And then at the top corner, I’m going to have an 18 inch piece that came across my shoulder blades there. So, I need to mark nine inches from my center point. Let me get that a little easier for all of us to see at home. And then I’m just going to come over nine inches to my center point so that’s going to give me nine and nine is 18, ok? Now, from here, I want to draw this line and then I’m going to cut the line. So I’m going to kind of make this thing go how I can on my work table. Pretty darn easy! Then I’m going to use a ruler coming this way, and then I’m going to grab my big square from back here and use that as the other half of my ruler and I’ve just about got what I need. Of course you could, if you were, if you had your old carpenter’s chalk, you could snap a chalk line, right? And this just needs to be close. Whatever we make, because we’re cutting both at the same time, were going to be fantastic for the cape, ok? Then I’m just going to extend that line out a little bit. So that’s done and I’m going to, now, get the rulers kind of out of my way and just free cut that with the rotary cutter. It will make life a little bit easier and probably easier for us to follow along. Ok, so, here we go. We will end up sewing this with our right sides of our fabric together so if there’s a little bit of this marker line showing still, it’s not going to be a problem. Don’t get too excited when we’re done. We have one more cut, so don’t go whipping your fabric off the table and saying “Ahha! I’ve got it!” right? We have one more little slice to do here. See, a lot easier than it looked. Just like that, ok? I’m just setting those out of the way for a moment. We’re going to use those to make our ties. But the last cut we need to make… I like my cape to kind of arc back to the center, so this is now my low point, the corner becomes my high point, and I’m going to make this just a nice, gradual curve. I like to get my fingers behind my cutter when I’m doing that. That looks about right. Oh, when I say that and something fell off. Oh, you know what, it’s just my little bump in the table. Cut that a little bit again, no big deal. Oh, why is that shifting on me? I should be cutting from the corner. So funny! You know, I’m always thinking about getting a good angle so that we can see what we’re doing from home, but let me just take a moment and make this a little bit easier on me. There we go. See? Just like that. Sorry about that, but, as you all know, I like to do this in as few takes as possible, so, sometimes, you have to sit through a little bit of that. Awesome, right? Ok, so this is the front and the back of our cape, already dialed in. Now, I’m just going to fold this slightly out of the way for a moment, and then let’s talk about the ties real quick. From our fall off here, I’m going to use the green fabric and I probably only need one side of it here, and I’m going to make a 2 inch by 30 inch strip. Ok. Let’s do it this way and this way and this way and this way and I’m first going to trim off my edge. That’s the selvedge there. Ok, so that’s a goner. And now, yes, I didn’t close my blade. I’m going to cut myself a two inch strip, ok, and another two inch strip, like that, and these become the ties and I’m just going to stitch these with the right sides together and then turn them right sides back out so I’ve got some nice tubes and I’ve got some fun tutorials, I should say, quick tips out there for you, for making the tubes, so we’ve got some elongated information, if you need. You know my string trick. You’ve seen my ruler trick, I hope. So, there’s a lot of ways to turn these tubes, but, for today, because I want to spend some time on the applique and the satin stitching and things, I’m going to have to tell you that I basically finished the tubes already for you, but what I’ve also done is stitched the end closed, so I’ve got one closed end and one open end there. That open end is going to get stitched into the seam allowance of the cape in the cape’s liner so we’re not worried about closing both ends, ok? And I’ll show you how to put those in in just a second. When it comes to doing satin stitching and or raw edge applique, when you’re using fusible web, please be aware: if it’s a paper backed fusible web, like the one I use, the Heat N Bond Featherlight, you must transpose your image, right? So you can’t use it if it’s a letter the way you would recognize it. You must use it from the back side or the backwards version, like this. Okay? Because the paperback fusible transposes the image a second time. So when you’re using letters, always use a reverse image, please. Ok, and then all you simply do is you take your diagram, and you would lay your fusible web on the top, and then you take out that little sharpie marker, and one of my tricks I’ve done, and you can see here I already have this traced out for us, ok, but one of the things I like to do when I’m marking this kind of stuff is, I’ll come in here and I’ll just do little “L” shapes that kind of show the corners and the gaps and then, when I’m done, I come back in and I address those lines, like that, with my ruler. So, if I need to fill in a space, then I just come in here and I’ll ruler between those two little spaces, if I need. I’m going to cut this out, so, if it’s not perfectly traced, that’s ok, but I’m just going to go around and use those little “L’s” and my ruler so that it makes it a little easier than trying to draw all that detail work and having it shifting around on us. So, hopefully that trick makes a little bit of sense for you as well. And what I have done already is, I have already cut out these yellow pieces and, when I was designing it, I wanted the green from the background of the liner, the background of the cape itself, to show through, right? So, I only made the red pieces and then I’ve also made all of my little yellow pieces here. So now that I have the red pieces traced and fused onto the, well it would be the back side of the solid fabric, which, it’s solid, so it’s either side really. Now I’m going to go ahead and cut this out, but in cutting it out, I am also going to use my rotary cutter and my ruler because, at this part, I want it to be as crisp and as beautiful as possible. So now, I’m just going to cut my logo out. Once the logo is cut out, then I will iron the red and the yellow to the green before I begin completing the construction of the cape. I do not want the satin stitching that I will use, like this, to hold down the anchoring of the logo, to show through on the front side of the cape, ok? Here’s a fun little trick. For getting on the insides of some of these lines, sometimes I will start it, if I wanted to scissor cut it, but for the most part, even without the ruler, I can get in here and go pretty straight, pretty straight. Ok. So, you can do it with or without the ruler. I prefer the ruler. It also keeps your hands a little safer as well. It takes a little bit more time, but we’re not in a hurry because we love our craft, so the more time we can spend with our craft the better, right? Try not to cut all the way through your logo to the other side, but, if you did, the glue would hold it back in place, no problem. Ok, one more little cut to make here, one there. Tell you what, I’ll finish cutting this and be back in a flash. Told you that wouldn’t take long. Ok, so I now have my logo all cut out and the little highlight pieces. Now what I want to do is, I want to make sure that my cape piece is completely organized and flat on my board, so I’m just going to take a moment to move that out of our way and our ties, we’re going to need here in a second. So this goes on the green and it goes facing upright. Ok. So we’re going to have that there. We’re going to get this on here, like that, and now, if I remember correctly, I came down about a hand or a half a hand’s width. I was kind of thinking that this top part, right here, would be right along my shoulder blades, and I wanted the other part to come down, so I kind of figured, you know, it’s about a hand’s width. I guess you could measure. The nicest thing of anything is that this fabric came right off the bolt, so I had this really nice, crisp edge that I’m going to line this out on and the point of the logo is what I’m talking about. Uh oh! There it is. We must peel the paper off the back; that exposes our glue. And now we’re ready to put this in place. And with the Heat N Bond Featherlight, it doesn’t love to be ironed over and over again, so I want to iron this just one time. So, I’m going to put the red and I’m going to put the yellow pieces in place before I press it. Ok, now I have that just the way I want it and I’m going to come in here, you want a nice, dry iron. I’m hoping mine is going to not steam, because I forgot to turn off the steam. So we’re just going to press this for about two to three seconds and I made it. Get that iron out of the way. I’m going to let that cool. Now, I’ve got my sewing machine set up for the satin stitching and a satin stitch is just a narrow little zigzag, so, right now I’ve got it set up to be a three and a half millimeter wide zigzag, but only a 0.3 length, so, it’s going to be a nice, tight, little zigzag stitch to form that and then, the other thing that’s kind of cool, somewhere around here, we’re just going to use the back of this, I think. I will also use a piece of paper on the back to act like a stabilizer. When you’re satin stitching, it’s nice to have a stabilizer that will help you not draw the fabric up a ton. So I’m just laying that in there. Lift my presser foot up. Now with the satin stitching on this particular machine, it zigzags off the center needle position and so I’m going to watch. On the center of my foot there’s a line and that line in the middle of my foot is going to be the line now that divides the fabric for the applique and the fabric of the green for the background cape. So, I’m going to start stitching this now. And with the satin stitching, to get a really pretty satin stitch, you really don’t want to be pushing your fabric too fast through the machine. I really prefer to steer anyways instead of push or pull and the only real thing I can tell you about on some of these corners, you’re just going to want to take the time to make sure you pivot nicely on your corners. Just take your time, turn up the music, and enjoy satin stitching around your logo, and I’ll be back in a flash. Alright, once you’ve got all your satin stitching done and, just a reminder, the reason I want you to satin stitch is it makes this very, very washable. We do need to get all the paper off of the back, so just grab ahold. We’re using some relatively inexpensive printer paper and, if you need, I’ve got a little pair of tweezers in my hand here too. Sometimes you can poke at the stuff too with tweezers. I’m not going to worry too much about cleaning up the threads because this is all going to be hidden on the inside and even if all that paper doesn’t come away, it will wash away later on. Call that good enough, right? So now I have this laying basically right side up here. I’m taking my ties and I’m taking my ties and I’m making sure my ties stay to the interior. I’m going to drop them down about, oh, a half of an inch, and I’m putting a straight pin in and I’m actually going to let that tab stick out just enough that I can see it when I’m stitching around, right? And then, the other thing I’ve learned to do is, I’m going to come down here in the field and I’m just going to stick another pin and then, this one, I’m going to do the same. So, about the same about a half inch down, a little bit of that tail sticking out so I’ll be able to see it when I come around the corner. Bring that bad boy down. Let’s just pin them both together and that’s only being pinned there just to keep them from slipping around or getting caught in one of our side seam allowances. I’m sure that makes sense to any of you that have had that happen in the past. Now you’re going to take your print and you’re going to drop your print, print sides together with the right side of your green solid fabric. Ok, and I’m going to leave an opening at the bottom which will make my life much easier for my sewing. So I’m just going to line up my corner here and I’m going to grab it and bring it over to my machine, set it back to my straight stitch, drop the presser foot, and let’s do a little bit of a back stitch as we start. That’s going to make it easier to pull all that fabric through. And now I’m just going to go ahead and stitch all the way around and leave about a six inch opening right before where I started over here so I can turn this right sides back out. So, just as a reminder, as I’m coming in up here close, I’ve got that other strap up here, so just make sure that everything’s nice and organized. You’ve kind of got everything finger pinched together. Ok? And I’m just going to keep finishing this out, heading back for that starting spot where we’re going to leave that six inch opening. Now I’m just stopping to check, real quick, and see where my starting spot is. So, it’s way over there, so I’ve got a ways to go before I’m ready to stop. If you had a problem with your cut along that arc at the bottom, this would be a good time to sort of soften it up. I don’t know if you’ve ever seen anyone have a problem with a curved cut before, haha! Ok, so now I’m going to go ahead and cut my thread, a backstitch is important there as well, and now we’re just going to reach up inside. Now, remember, you’ve got those pins you put in there, so be very careful. I’m actually sliding my hand along the print side because I know the pins are in the green fabric, right? And we’re just going to roll this back out. And now that that applique has been stitched into place, you can iron around it or on it all day long. It’s not coming off, ever, ever, ever. So, here we go. There’s our ties. Let’s take this pin out now so I don’t get stuck with it again. There. And this one. And this one. Right? I give it a little shake through. Ok? And then if we’re going to be stitching something this large, it’s often a good idea to kind of come in here and roll your edges, right? And then kind of press on it so everything stays nice and crisp like that. And, as a matter of fact, just to make life easy on us here, let me bring this one to you and show you what we’ve got, ok. So this is what I mean by our topstitching. Right, right along there, that’s how I seal that edge up, right? So that works good. We’ve got our logo, so that’s good. So all we have to do on this last cape is finish with the topstitching and you are ready to wear this and go for your very first flight. Now, the most important tip of the entire tutorial I have for you is like this: and now, I am a parent, you know this, I’ve got a son and a daughter. And so, when I was constructing the cape, I had a concern, normally if you tie your cape around your neck, like this, there’s a choking hazard, which I’m concerned about. Some people talk about breakaway, velcro, but it will actually start to pull on your neck and become uncomfortable. So, what I learned with those extra long straps is you bring this around, like this, and you can tie it behind your back or you might have to help your children tie it behind their back. This is incredibly comfortable. It provides no choking hazard. Let me see if I’ve got it, like that, and, better than that, look! It makes super muscles. I love it and I love all of you! Thanks for watching today at Man Sewing.
Hemming pants is a basic skill that can make all of our lives a little easier. Today I show you a great trick, so that you don’t have to sacrifice that great worn hem already on your jeans. You’ll never want to put off hemming your jeans again!
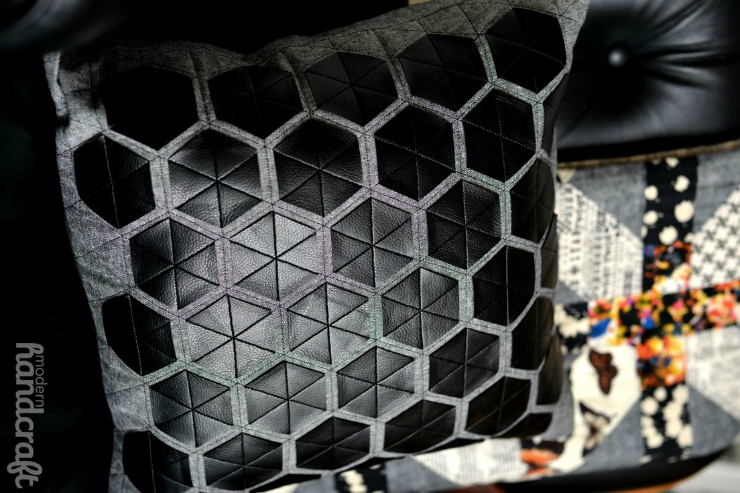
Today’s new tutorial at Man Sewing is a Leather Applique Pillow. This is a simple project that will give your couch a big boost of self confidence! Check out all the details here: http://land.mansewing.com/leather-applique-pillow/