Did you see the new Scope yesterday? Get an inside look at the projects we’re getting ready to film for Man Sewing next week!
Bonus Video: Project Show & Tell


with Rob Appell
Did you see the new Scope yesterday? Get an inside look at the projects we’re getting ready to film for Man Sewing next week!

Today’s quilt tutorial is more than an illusion! Follow along to learn how to make this fun quilt! Click HERE to get all the details!

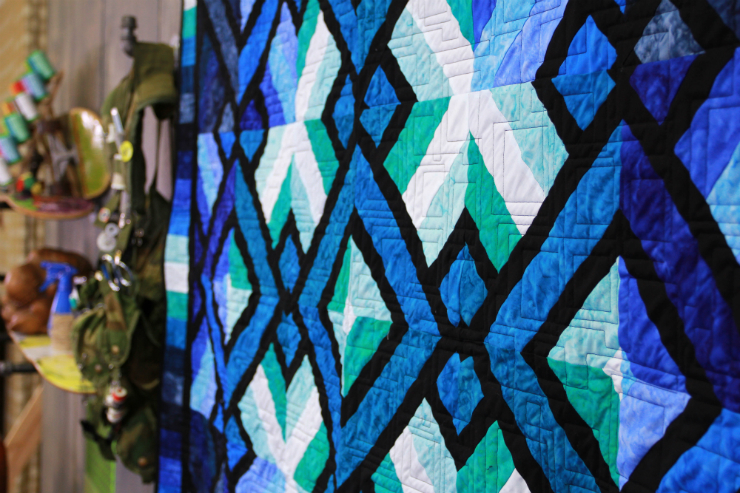
Rob had a special guest on Man Sewing! Rob shows Jenny Doan a new cool version of the 3 Dudes Quilt, originally tutorialed by Jenny!

Find all the details here: http://land.mansewing.com/three-dudes-quilt/
Video Transcript:
Rob: Hey everybody! It’s Rob from Man Sewing, and I’ve got an incredibly special guest today. It’s Jenny from the Missouri Star Quilt Company. Jenny: Hi everybody! Well, you know, I like to travel… Rob: Yes. Jenny: …so I thought I would walk all the way up the stairs and meet you today. Rob: Well, I certainly hope it didn’t take long to get here or anything, or you didn’t have any problem with your luggage on the way. Jenny: I’m a little out of breath at the top of the stairs, I’ve got to admit. Rob: Only because she was singing all of the way up. Jenny: Well, that’s true. Rob: It’s a true story. Jenny: That is true I do sing all the time. Rob: Oh, we’re going to have so much fun today. Our tutorial is basically a modification of our Strip Surprise from the 3 Dudes Quilt Company and, this is a true story: when I first got hired to do the Man Sewing gig, I was studying what Jenny was doing on her YouTube channel, right? And so I fell in love with the way she was modifying this pattern early on. Jenny: Seriously? Rob: I did. I did. Jenny: Oh, awesome! Rob: And I thought, “You know what? I’m into strip piecing right now. I want to try this.” Jenny: Yeah. Rob: And so… Jenny: It’s such a cool idea. Rob: Oh my goodness. It was so much fun! Jenny: Those guys are brilliant brilliant! Rob: Yeah, yeah. I would like to meet them some day. Jenny: Yeah. We love the 3 Dudes. Rob: You’ve actually met them? Jenny: I have not. Rob: No! They have great stuff. Jenny: I know! Yeah! Rob: We should take a road trip together out there. Jenny: We should. That would be awesome! Rob: A surprise…like a knock on the door. A surprise, “Hey we’re here! Oh, fantastic!” Well, we could goof off all day and we probably will, but let me run you down through a couple of supplies real quick. Jenny: Don’t you want to show them this quilt? Rob: This quilt here? Jenny: Yeah! Rob: I just assumed they can see it, but, yes. Let me see if I can get this right. Look at this lovely quilt I have behind me. Jenny: Take a look at this quilt behind us! Rob: Yes! No, this is actually radical and I love the quilting and everything in, in the way it came out. Jenny: Oh, it’s gorgeous! I think, it’s gorgeous, really! Rob: Yeah, but… Jenny: You got it from me. Rob: I did. I did, but do you think it’s going to be hard to make? Jenny: Oh, no! Oh, everything we do is easy and quick. Rob: It is. And I was blown away with the secondary design elements that came out of it just by one of the little swaps that I did. So now I’m going to run through this. Jenny: Ok. Go ahead. Rob: We’re ready for that. Ok, so you need only one of your roll ups, like a 2 ½ inch set. This happens to be an Artisan Batik from Robert Kaufman, and this one, I think, is called Sparkling Water, or something like that. But, isn’t that gorgeous? It looks just like the ocean to me. Jenny: Yes. Rob: Ok. And then I used, oh, this is a real treat not having to cut all my 1 inch strips. Jenny: Oh, isn’t that a treat? Yeah. Rob: Yep. So, I got this. It’s just the Kona Black, but it’s all precut and ready to go, so I just basically unpack them. Jenny: I love that. I know. This was so hard! Rob: So, you ready to unpack? Jenny: I’m ready. Rob: Cool! If you’ll take that one apart and I’ll take this one apart; we’re going to need them both. Jenny: Oh my goodness. Rob: I know. Jenny: Craziness. You know, a lot of people buy jelly rolls but they don’t always open them, and they don’t really make it easy. First thing, you’ve got the label and they’ve got the rubber band… Rob: Right? Jenny: …but they’re so cute all wrapped up. Rob: Yeah. Jenny: Alright, here we go. Rob: Ready? Jenny: Yeah. Oh no, no! Don’t! You’re nuts! Rob: A little bit. Just a little bit. So, what I found as I was unpacking my, my strips here of the batiks is, I wanted to try to focus on getting my light colors into my kind of centers of the, of the strip sets we’re going to build, so we build these X’s in the back of the quilt that you see. Jenny: Ok. Rob: And I also found that there were a lot of colors that had three strips and a lot of colors that had two strips. So we only need two of each. The third one we’re going to use for our borders later on. Jenny: Oh, ok. Rob: So, as I was unpacking this, I would be like, “One for me, the borders, and two for you, the quilt. Jenny: Ok. Rob: Ok? So, two more for you. One for me. Jenny: Well, and this is not true for every, every roll up strip. Rob: Of course not. Jenny: I mean, some of them, each, there’s a different, each one, every color is different in some of them, is what I’m trying to say. Rob: Oh yeah. Jenny: That’s what I’m trying to say. Rob: Or every color is the same! Jenny: So, you just basically want to use twothirds for your strip set and onethird for your border. Rob: Exactly. I didn’t quite know what to do with the leftover stuff or that one third portion of it… Jenny: Yeah. Rob: …and then I got in and thought, “Oh the borders will be good,” and we’ll show you how to do that. Jenny: Plus those piano key borders are really cool. Rob: So, basically, I just did that with this particular roll. I just unpacked it and these became my first set of colors, and we’re making three different colorways. And once we get this all stitched together, I’ll have you show them all the colorways we’ve built in here today. So, with this, let me show you how I kind of organized, and then I’m going to let you build it, if you don’t mind. Jenny: Ok, sure. Rob: Ok, so I wanted to focus on kind of keeping the light fabrics in the center. So, when I was looking at this, I was trying to modify it so that I would always have black on the outside edge. Jenny: Ok, that makes sense. Rob: So, where you’ve got your black there, here, and then there’s one more strip I’ve hidden underneath here, like this. Ok? So, basically, these are going to be built in this order: so you’re going to have a skinny strip, a colored strip, skinny, three colored strips, and I, like I said, I like to keep the light in the center. And then the skinny, a colored, and a skinny again, just like that. Jenny: Ok. Rob: Alright, Jenny. Thanks for getting this all stitched together for me. Jenny: You are welcome. Rob: Now, let me just point out again: focused on the light colors in the center, then we have the skinnier, the black strips, then our colored strips, then a skinny of the black strips. Jenny: Ok. Rob: Now, our next step is to make sure this is all pressed nice, one last time. Jenny: One of the things, when I’m pressing, I tell people to always make sure there’s no little folds in your seams because that changes the size of the block… Rob: Absolutely. Jenny: …or the strip set. And that will change the size of the block and that can be crazy. Rob: You know what I’ve also seen change the size of the block is sewing parts of one block on one machine and sewing part on another machine. Jenny: Oh ya, there’s so much. It’s that wholestart a project on one machine and finish on one machine. Rob: I really agree with that. Jenny: It’s, it’s important. Rob: So, for this step, what we need to do, and I’ve already cleaned this edge off a little bit, is I want to measure how tall our block, our strip sets are so we can make it into a perfect square, ok? So, for this I’m just going to hold my ruler this way. Jenny: So, however tall they are, that’s how wide we’re going to cut them. Rob: Correct. Jenny: Because we’re making blocks, we’re making squares. Rob: Yes, and so I’m just at 14 ¼ here. Jenny: Perfect. Rob: Ok, so now what I want to do is, I want to measure over 14 ¼ from this edge, and I’m going to slice here. Jenny: Perfect. Rob: And one strip set row will yield three of these blocks. Jenny: Ok. Rob: Ok? So I’m going to make one of them, ok? Jenny: There’s one. Rob: I’ll let you grab that and set up for… Jenny: They’re so pretty, aren’t they? Rob: I love the colors. Jenny: I do. I love…I’m like Rob, you know. Actually, where Rob lives, I was actually born there and love the ocean as well. Rob: Now, why don’t you walk our friends and family at home through how we’re going to piece these back together, please. Jenny: Ok, so the cool thing about this is now they’re squares so can do anything you want to because they’re even on all sides. And so, so we’re going to have one square horizontally, one square vertically, like this, we’re going to put them right sides together, and we’re going to sew them all the way around the outside edge. And it’s just really cool how this works. So, I’m going to go ahead and do that. Rob: And you’re just starting on one corner and going all the way around the square. Jenny: Yes, that’s what I do. Rob: Fabulous! I played with both ways of sewing: one side, the other, the top and bottom, It didn’t make any difference. So…and while she’s sewing around that real quick, I want to show you the other colorways that you could build out of that same batik roll. So, this was kind of the medium family. You’re seeing the brighter of the families. So, here’s my fun medium family. Again, I’ve got my lighter fabrics in the middle, kind of gradiating my way out, ok? And then the other one I have, it’s a little bit darker read on this and technically, yes, my lightest of my fabrics is this gray, but I really wanted the blue in the middle because I wanted the blue to kind of coordinate with the rest of the quilt. And you can see those way out here in these squares as well. So, I was kind of trying to play, kind of get that variegated color effect as well. So, these are the other kinds of strip sets that I made, and, again, just as a reminder, I made two of them each colorway. Did I stall almost long enough? Jenny: That makes the quilt look so beautiful. I love how the lights are in the center and then you kind of framed them up. It’s so pretty. Start down. I’ve just got one more side to go. Rob: And when you finish sewing this, there’s no real way to press anything, so we go right into disassembling it all over again. Jenny: Yep. This is where the amazement happens to me. I mean, you see this and you’re just like, “Oh! So cool.” Rob: Yeah, the first time I opened up that first little new square we’re about to create, I was very, very happy. Jenny: It feels like Christmas. .Rob: Yep, it does. Do you want to cut this one? Or do you want me to? Jenny: Oh, you can. Rob: Alright. She lets me do all the fun stuff. So, for this cut, I’m going to go ahead and cut through the corners of my seam allowances. So, right where my quarter inch seams met up, correct? Jenny: Directly diagonal. Diagonal one. Rob: So, I’m going to do a diagonal here. Jenny: On both sides, yep. Rob: And a diagonal here. So, if you’ve got one of those cool lazy susan mats at home would be fantastic because you really don’t want them to move. Jenny: Make sure this is right in the corner. Rob: You got ‘er? Jenny: Oh there you go, yep! Rob: So, we really don’t want to move the fabric, and remember, I’ve got those grip strips on so I’m lifting the ruler up and I’m dropping it back down. I’m going to go to this side. Jenny: Oh, you right hander! Rob: I know. See, we would be really good if I did all the righthanded cuts and you did all the lefthanded cuts. Jenny: We’d just trade off. Rob: Straight through. So again, I didn’t move the fabric so that I have my diagonals there. And here comes the magic. You do it, you do it. Jenny: Here, look at this. Oop, we need a little cut right here. Rob: Oh! Jenny: There we go. Rob: I get them all? Jenny: Yeah, so now we get these four blocks, like this. Rob: Fantastic. Ok, let’s do it. So we open them up… Jenny: And because we laid them vertically and horizontally, you now have strip sets that are going opposite directions. Rob: Isn’t that cool? Jenny: Isn’t that so cool? So, you can do this. Rob: Uhhuh! Just like that? Jenny: Or you can do this. So, how did you lay them out for your quilt? Rob: Well, I tell you what, last… Jenny: I love these two different…. Rob: I did it a couple of different ways. Let me press these so we can see them a little bit better. I’m going to ask you. We’ve got another one here. Jenny: Oh, sure. Rob: We want to cut that open. Jenny: Because we want to see, to see how the, we’re going to lay these together. Rob: Correct. And I hid the ruler and I hid the cutter. Jenny: That’s alright. Rob: A little Easter egg hunt going on in here. Jenny: I’m pretty good at finding those. Rob: Good. You’ve got to beat all those grandkids to the goodies. Is that what it is? Jenny: Yeah, but they don’t touch my rotary cutter, though. Rob: No? Good. Now as I’m pressing these open, I’m trying to press it so that that skinny strip, that’s the border strip, is being pressed too so that I don’t have to worry about folding the seam allowances. So, to answer your question, I first started…and maybe I can have you start building these. I started in the very middle square, as I was building, and I actually looked for my opposite colors here, which brought in the opposite colors here, like that. So, I built this one first, and then I started to gradiate my way out, that way. Jenny: I love it. Rob: And then I brought in the other colors and I tried to keep my brightest squares toward the center, moving my darker squares toward the exterior, and there was a point where I had all of the squares laid out, and it certainly seemed like I had made only one incorrect, so I went around and double checked and double checked. And as soon as I have these ones ironed, we’ll point out what everybody can look for at home and then we’ll talk about borders. Jenny: Alright, I’ve got, I’ve got these four and I’ll let you iron that before we get onto the rest. Rob: Fantastic. So then as I was building the next series of rows I thought, “Well, wouldn’t this be terrific if I could have these different colors come together?” But I didn’t want my same fabrics to touch, so then I brought this one over to this side so that I was looking for my opposites. Jenny: Two different colors, yeah. Rob: Correct. And my opposite’s there and so that’s going to give me opposites. Jenny: Opposites. Rob: Excuse my reach there. And opposites, like that. Jenny: That’s so cool. So then how many, how many blocks, what do we have across here? Rob: I believe it was 36 if I remember correctly. Jenny: Six across and six down. Rob: Yep. Jenny: And, you know, they’ll have to refer to this picture for that color placement. Rob: Right. Jenny: With those beautiful, dark ones come in the corners. Rob: Right. Rob: And, at my retreat, as I was just bragging about, (one quick option and then we’ll move onto borders) one of the ladies took some of the lights from the center and actually moved them into the outer corners and then brought some of the mediums into the center, and then had the darks on the outer portion. Jenny: I imagine you could do anything. Rob: It was like pulsing. Jenny: Oh! Rob: It was really cool. Jenny: Beautiful! Rob: I’ll make sure there’s a… when this tutorial comes live, I’ll make sure there’s an alternative photograph from my friend who made hers at the retreat. It’s really stunning as well. Jenny: That’s great. Rob: Ok, so… Jenny: So, we’re going to sew six across, six rows of six and it makes a quilt that is what size? Rob: I don’t know. It’s sixty squares when I was all done. Actually, I do know because, in building the borders, I had to measure, because…let me walk us through that, real quick, if you’re ready. Jenny: Yeah. I think so. Rob: We don’t need anymore of this, ok? I just want to go home and make the quilt back up. Thank you, my dear. Jenny: It’s beautiful. It is just gorgeous. Rob: So, as I said, I had those leftover strips, the ones that were, that I had three of in this particular pack, and so then I did a strip set row without any of the skinny black strips, just color and similar in colorway, starting with my light and kind of gradiating out in both directions, now, try to go slow with this, I figured the distance along the outer edge, right? The outer edge of my quilt. So, the first step was, I put in one more black, skinny strip all the way around. Jenny: Ok. Rob: So, I needed to sew two strips for the bottom, two strips for the top, two each for the sides. So, I used eight strips there. Jenny: Uhhuh. For that first border? Rob: Correct. The inner border. Then I measured the math all the way around, and then, I think, at that point, it was sitting at about 56 or so. Jenny: Uhhuh. Rob: I stitched this together, I figured out how much I would need to go all the way around the quilt, figured out how much I needed here, and divided it until I could evenly get enough strips. Now, I know that sounds crazy. So, here’s your answer: three inches. Jenny: Three inches. Thank you. Whew! Rob: But that’s how I did it because I do everything on the fly. I literally measured, and I said, “This is what I’ve got and this what I need, divide it in,” and that’s how I found out. Jenny: Perfect. Rob: But at the end of the answer, it’s three inches. Jenny: Ok. Rob: Three inch cut. Jenny: Whew, that was a lot of work for that. Rob: So, when I got done with all those three inches, I had enough for the label along the back. Jenny: Oh, very cool. Rob: That was all that was left with my math. So, if I had gone to 3 ½, I would not have made enough for all those strips I needed. Jenny: So 3 ½ inch strips. Rob: Correct. Jenny: And then sewed them together, end to end. Rob: I did, and I also continued the color order as it went. So, basically, it’s probably easier to show here, I stitched this color to this color. Jenny: Ok, so like right here. Rob: Exactly. So that way it kinda goes all the way around. Jenny: Yep, beautiful. Rob: And then, for me, as I got to the corners, there was just one, you know, piece that was a little bit shy, and it’s such a large, all over quilt, nobody cares. Jenny: Nobody cares. Rob: …will even see it. Jenny: Awesome. It’s beautiful. Rob: Thank you. Thank you. Thank you so much for coming and doing this with me. Jenny: Oh, you’re welcome. I love it. Rob: I’ve really been blessed to be part of your crew here and your family. Jenny: Oh, we love it. We love having you. Rob: Ok, enough sappiness. Ok, so we want to know what you’re going to use for your first colorway when you build your variation of the 3 Dudes Quilt and the 3 Dudes that are watching along, thank you again for fantastic patterns. And until we see you next time, this is Man Sewing.